
Willo Home Tour Inventory List
2/15/2024
Living Room & Dining Room
1.Wall mounted Plug In Double Swing Sconce: https://amzn.to/3SFILnZ 2.End Table: https://dialogphx.com 3.Coffee Table: https://dialogphx.com 4.Bookcases: https://amzn.to/3HYsUMm 5.Red Chair: https://dialogphx.com 6.Wood Side Table: https://dialogphx.com 7.Puzzle stool: https://dialogphx.com 8.Entry Wall Sconce: https://amzn.to/3UGAOkY 9.Sculpture: https://www.ennaia.com/product/leben/ 10.Sofa, rug, Vintage Triangle table, artwork and accessories – Contact me for more information (mrjamesjudge@gmail.com) Dining Room & Kitchen: 1.Dining Chandelier: https://amzn.to/3uC9SIB 2.Fun Love – (Tall art) Laura Madden - https://shop.iamlauramadden.com/warehouse-originals-limited-editions-standard-products/original_art_products/fun-love?product_gallery=241318&product_id=5690640 3.Dining Table, Rug, and Dining chairs – Contact me for more information 4.Stove Wall Sconces: https://amzn.to/49w95rs 5.Jungle Love – (Stove art) Laura Madden - https://shop.iamlauramadden.com/warehouse-originals-limited-editions-standard-products/original_art_products/jungle-love?product_gallery=241318&product_id=5666682 6.Appliances: https://homeoutletdirect.com 7.Kitchen Floor Runner: https://amzn.to/3UCBhF1 8.Butcherblock: https://www.flooranddecor.com/s/floor-decor/wood-butcher-block-countertops/american-walnut-butcher-block-countertop-8ft.-100020676.html Laundry Room: 1.Wallpaper: https://amzn.to/3wh3RBN 2.Ironing Board Wall Sconce: https://amzn.to/3UGAOkY 3.New Air Wine Fridge: https://www.newair.com/products/black-stainless-steel-29-bottle-wine-fridge Bedroom 1: 1.Twin Beds: https://amzn.to/3wbJqpC 2.Wall Sconces: https://amzn.to/3OLGwOL 3.Curtains: https://www.ikea.com/us/en/p/bollolvon-room-darkening-curtains-1-pair-gray-60325299/ 4.Bedding: Target 5.Ceiling Light: https://amzn.to/3OLa4vQ 6.Lockers – Contact me for more information (mrjamesjudge@gmail.com) Hallway Bathroom: 1.Sink: https://amzn.to/3OJL6gp 2.Faucet: https://amzn.to/4bBX9X8 3.Vanity Light: https://amzn.to/4bBFVJn 4.Shower System: https://amzn.to/3wjgxrM 5.Wallpaper: https://amzn.to/3UGEiny 6.Black and White Bath Mat: https://dialogphx.com Bedroom 2: 1.Curtains: https://www.ikea.com/us/en/p/bollolvon-room-darkening-curtains-1-pair-gray-60325299/ 2.Bedding & Lamps: Target 3.Ceiling Light: https://amzn.to/3OLa4vQ 4.Gold Canopy Bed: https://amzn.to/3uyM7kO 5.Nightstands and gold stools – Contact me for more information Primary Bedroom & Bathroom: 1.Books: https://dialogphx.com 2.King Bed: https://www.ikea.com/us/en/p/malm-bed-frame-black-brown-luroey-s99009474/ 3.Monkey Lamp: https://amzn.to/3OM3pBE 4.Bedding: Target 5.Ceiling Light: https://amzn.to/3OLa4vQ 6.Curtains: https://www.ikea.com/us/en/p/bollolvon-room-darkening-curtains-1-pair-gray-60325299/ 7.Large Art: https://juniperprintshop.com 8.Dressers, Accent Chair and plug in wall sconce – Contact me for more information 9.Bathroom Tile: https://www.homedepot.com/p/Daltile-Restore-Cool-Mint-4-1-4-in-x-4-1-4-in-Glazed-Ceramic-Wall-Tile-12-5-sq-ft-case-0148441P1/202627034 10.Bathroom Wallpaper: https://amzn.to/49dZk1j 11.Mirror: https://amzn.to/49mGTb6 12.Bathroom Sink: https://amzn.to/3wkEBKT Paint Colors: 1.Exterior: BEHR Cracked Pepper PPU18-01, Exterior Accent & Interior Trim/Doors: BEHR Broadway PPU18-20, Interior: BEHR Swiss Coffee, Cabinets: Custom Color Match Vendors: 1.Wallpaper – Arizona Wallpapering (Jonathan) 360-936-6568 2.Concrete Floors – West Coast Flooring (Christian) 602-327-9089 3.Paint – Alpha & Omega Painting (Israel) 602-318-8062 4.Landscaping – Willo Lawn Service (Don) 602-549-0732 5.Music – Dan Sell 480-251-2291 @gtar4dss 6.Mocktails – The Twisted Botanist (Jake) 614-551-7202 @thetwistedbotanist
1 Comment
Amazon Favs 8/4/23
8/4/2023
 HAKEEMI Red/White Wine Glasses Set of 12- https://amzn.to/44PokK6
PARTPHONER Large Outdoor Light Fixture 2-Light- https://amzn.to/44MwmUh MhyTogn Industrial Style Chandelier- https://amzn.to/3DxTgTn Super Ergonomic Pillow- https://amzn.to/3KgRHgo Kitchen Cabinet Handles Matte Black Cabinet Pulls- https://amzn.to/3OBeXYT Gold Eye Mask- https://amzn.to/3pTtR3c Amazon Favorites 7/21/23
7/17/2023
 Gold Eye Mask- https://amzn.to/3pTtR3c
Velvet Hangers 30 Pack- https://amzn.to/44Mavfg Car Vacuum Cleaner- https://amzn.to/43u1BBS Wonnitar Outdoor Rug- https://amzn.to/3QiAQh5 Ticket to Ride Rails & Sails Board Game- https://amzn.to/3DooOux ShineTech Wall Sconces Set of 2- https://amzn.to/44tSBOm Amazon Prime Day- Bedroom Favorites
7/10/2023
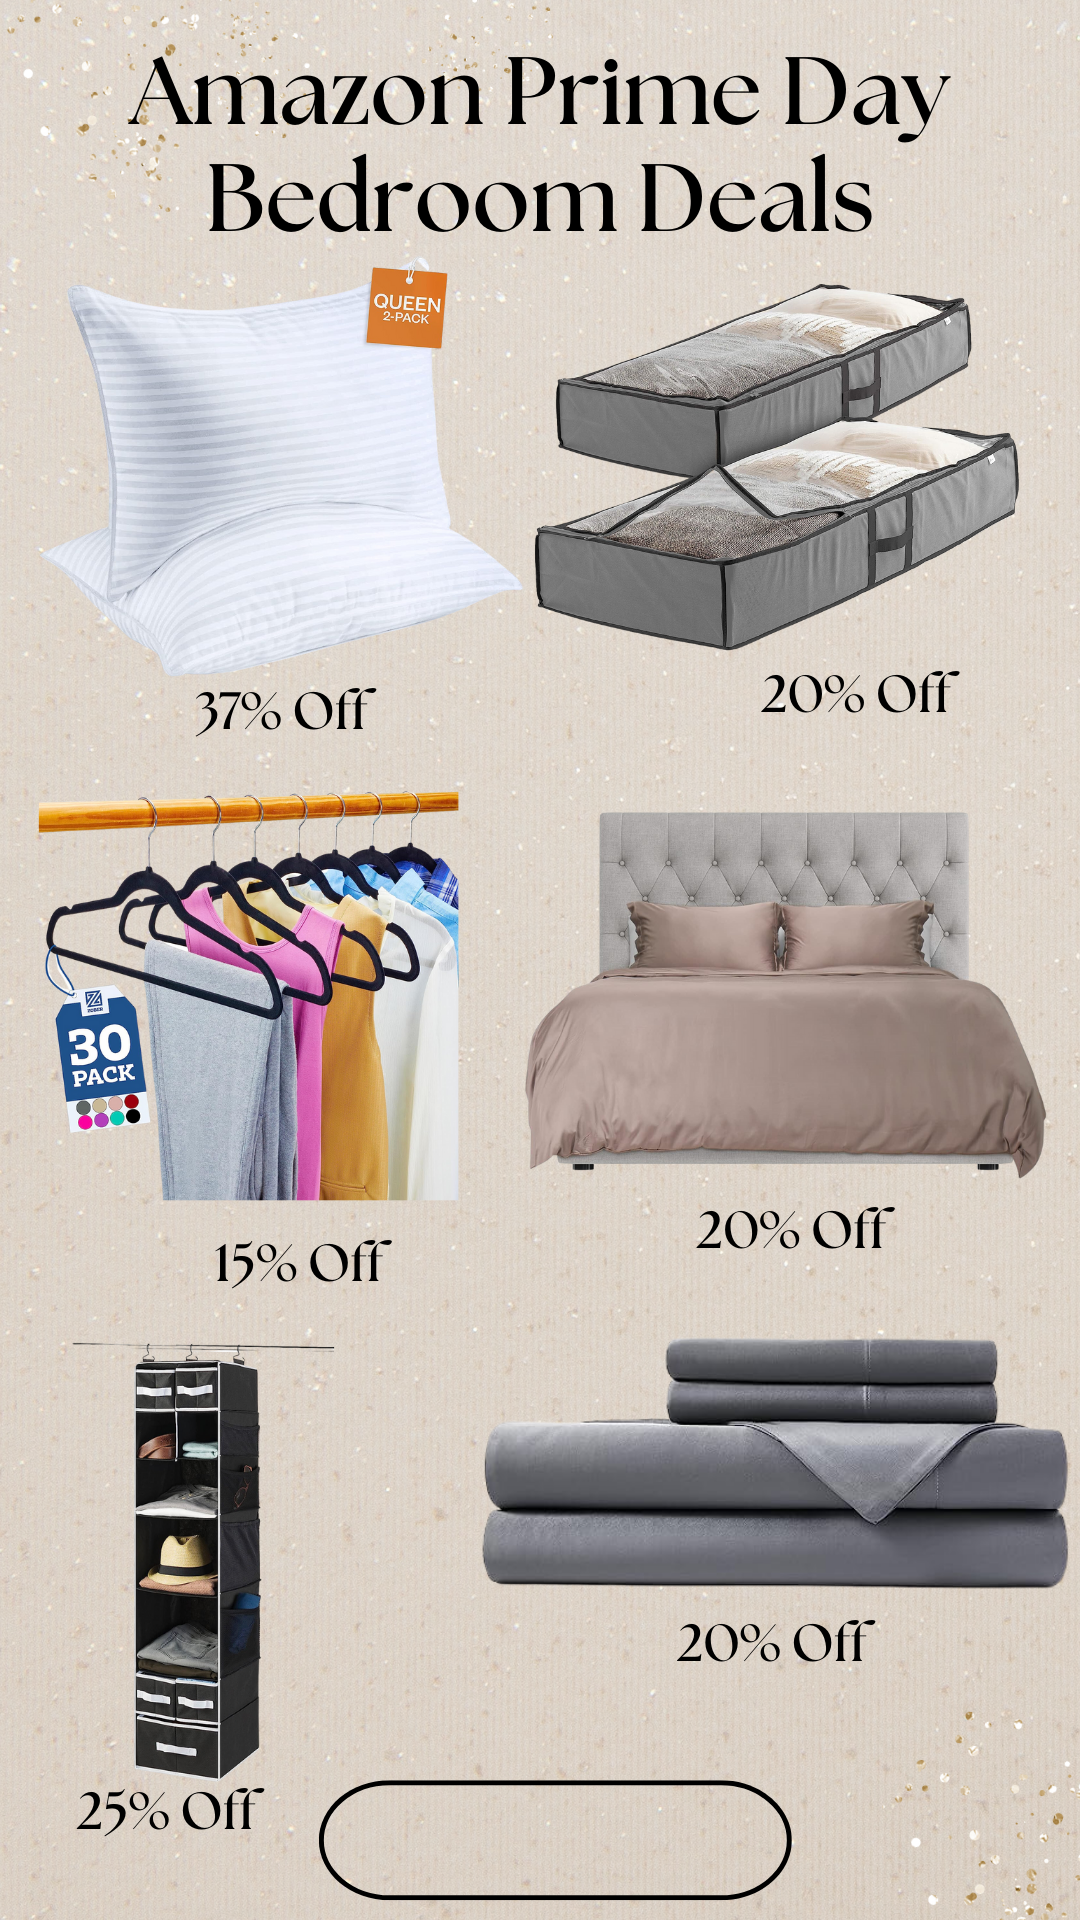 Sleep Restoration Bed Pillows for Sleeping- https://amzn.to/3O5agX6 (37% off)
Zober Under Bed Storage- https://amzn.to/3rqcAyO (20% off) Velvet Hangers 30 Pack-https://amzn.to/3D6F17H (15% off) Hotel Sheets Direct Bed Linen Set- https://amzn.to/44jonxx (20% off) 9 Shelf Hanging Closet Organizer- https://amzn.to/3DbQHG4 (25% off) Hotel Sheets Direct Viscose Derived from Bamboo Bed Linen- https://amzn.to/44B7YEl (20% off) Amazon Prime Day- Kitchen Favorites
7/10/2023
 FineDine Superior Glass Food Storage Container- https://amzn.to/44peGhm (35% off)
Paksh Novelty Italian Red Wine Glasses- https://amzn.to/3O7jIJm (23% off) Mixology Cocktail Shaker Boston Shaker Set- https://amzn.to/3D5kIr5 (30% off) HOMWE Cutting Boards for Kitchen- https://amzn.to/3JPjfcp (16% off) FineDine Stainless Steel Mixing Bowls (Set of 6)- https://amzn.to/3PKKCrT (10% off) Amazon Prime Day- Pet Favorites
7/10/2023
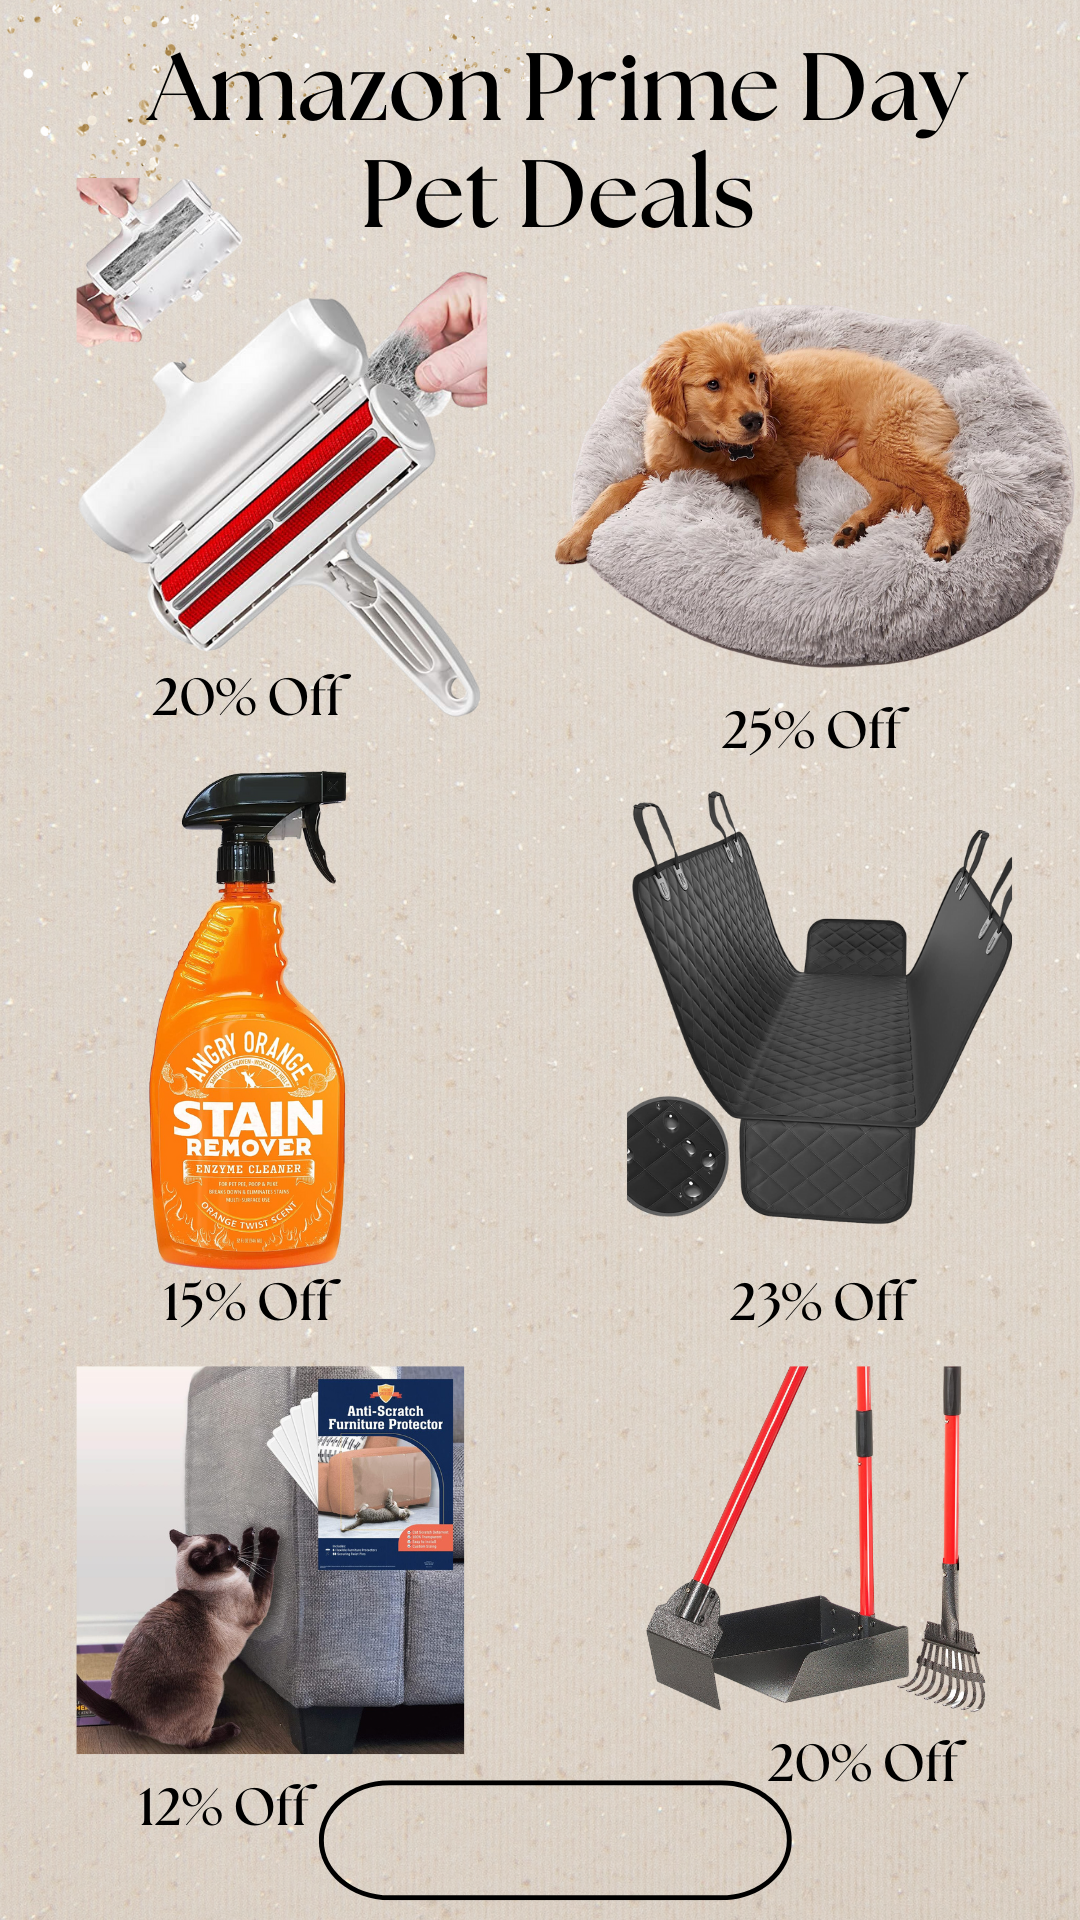 ChomChom Pet Hair Remover- https://amzn.to/44kghom (20% off)
Active Pets Plush Calming Dog Bed- https://amzn.to/3pzvV0d (25% off) Angry Orange Stain Remover- https://amzn.to/3XKlraJ (15% 0ff) Active Pets Dog Car Seat Cover for Back Seat- https://amzn.to/3JMGzYj (23%) Stelucca Amazing Shields Cat Scratch Furniture Protector Pack of 6 - https://amzn.to/3JOup0Q (12% off) Pawler Dog Pooper Scooper- https://amzn.to/3JTb3rv (20% off) Amazon Favs 7/7/23
7/6/2023
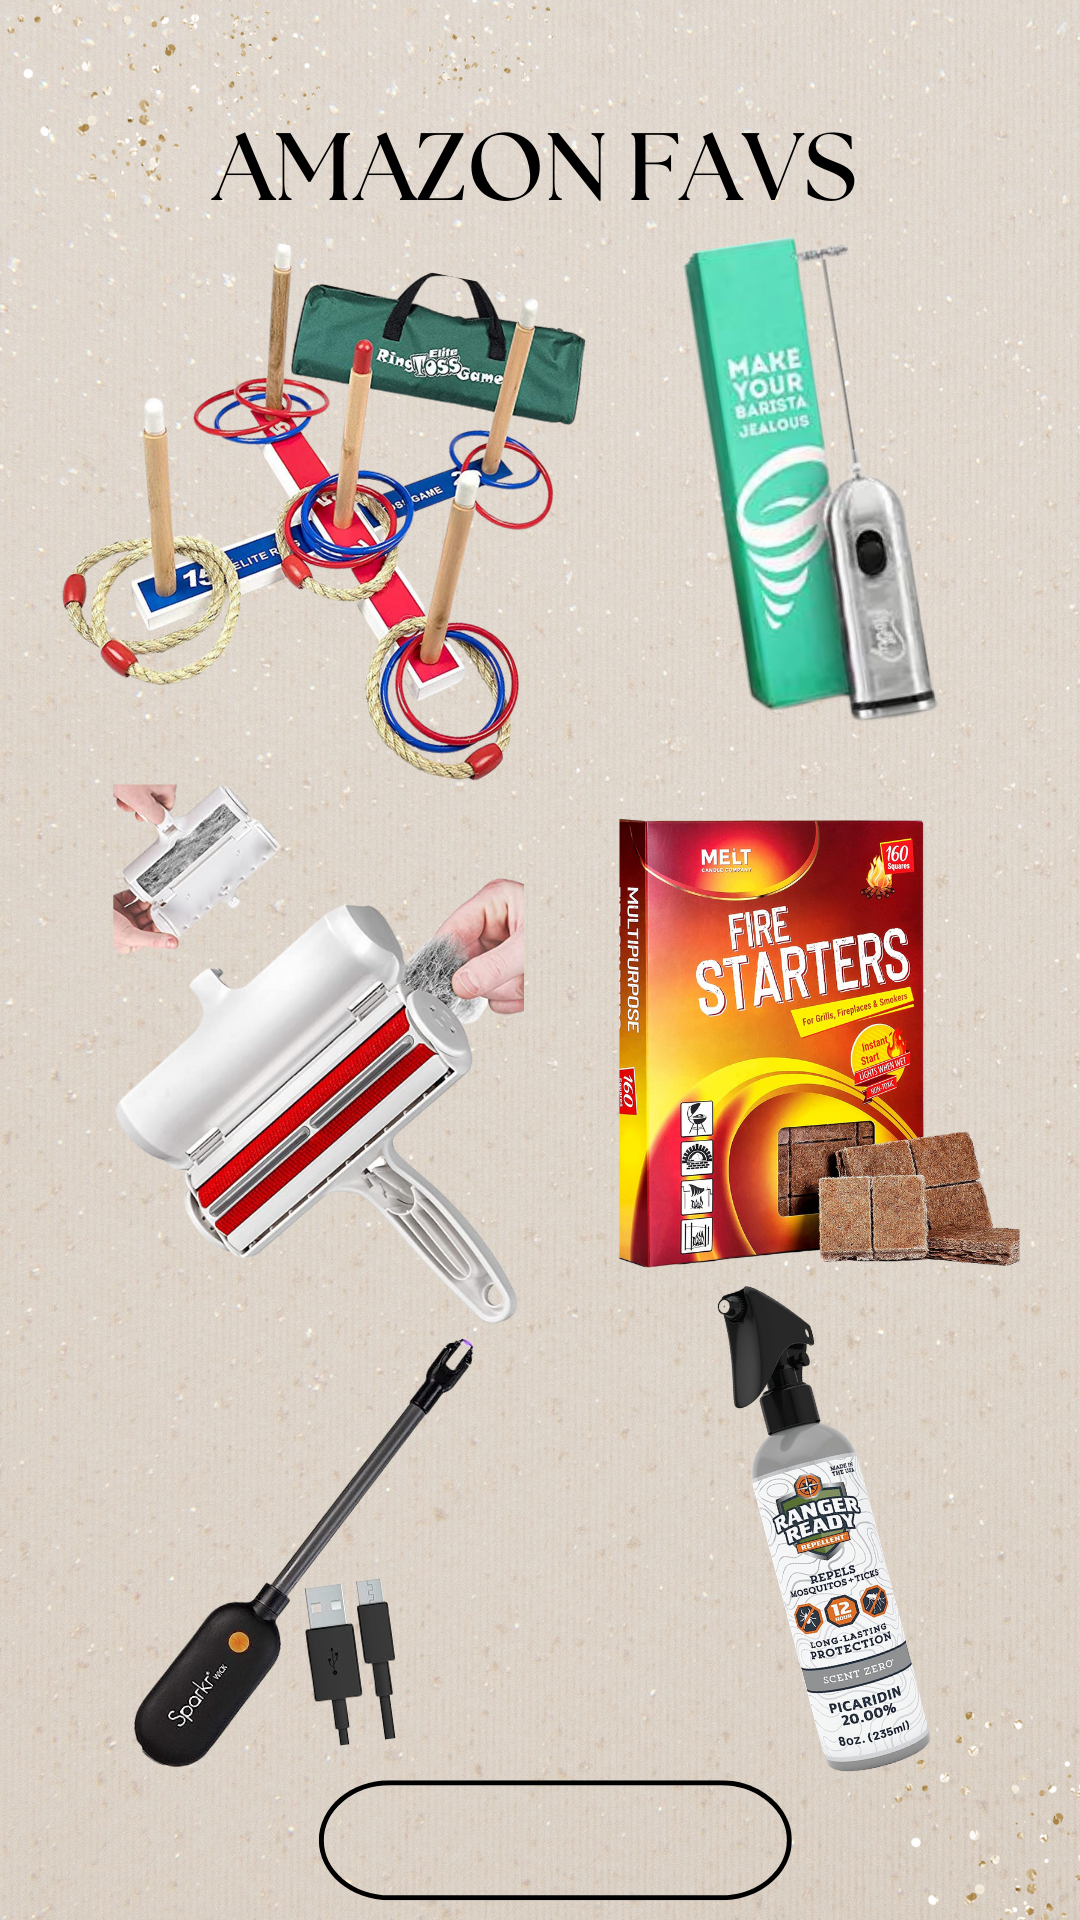 Elite Sportz Ring Toss Games for Kids- https://amzn.to/3qxQZnE
Café Casa Milk Frother for Coffee- https://amzn.to/3NlthEq ChomChom Pet Hair Remover- https://amzn.to/3nFEmGi Fire Starter Squares 160- https://amzn.to/3PhBniE Rechargeable Electric Lighter- https://amzn.to/40ACKeV Ranger Ready Picaridin Insect Repellent Spray- https://amzn.to/3JIUpLa Amazon Favs 6/30/23
6/26/2023
 Fire Starter Squares 160- https://amzn.to/3PhBniE
Rechargeable Electric Lighter- https://amzn.to/40ACKeV Bates Paint Roller- https://amzn.to/3XoqAFt Iron Mesh Chevron Fireplace Screen- https://amzn.to/44ehIVD Catinsider 70.9 Inches Multi Level Cat Tree- https://amzn.to/3Nq1pNZ Large Adhesive Hooks 22Ib(Max)- https://amzn.to/3PuK0GE Amazon Favs 6/23/23
6/22/2023
 Drive Auto Car Trash Can- https://amzn.to/3NDlba5
22 Inch Round Wooden Turntable Organizer- https://amzn.to/3Pnc2Ea Fire Starter Squares 160- https://amzn.to/3PhBniE 3 in 1 Charging Station for iPhone- https://amzn.to/43WTb7k Petrichor Nest Thermostat Wall Plate- https://amzn.to/43RGv1f Two Handles Widespread 8 inch Bathroom Faucet- https://amzn.to/46csUDv Amazon Favs 6/15/23
6/15/2023
 Beckham Hotel Collection Bed Pillows- https://amzn.to/443wxJM
Pat Your Pet Deshedding Brush- https://amzn.to/3PfrLET Dimmable Outdoor Bistro String Lights for Patio- https://amzn.to/42Ja5og Kraus Single Handle Pull-Down Kitchen Faucet- https://amzn.to/43F5oxl High-Grade Wide Shoulder Wooden Hangers - https://amzn.to/4402EKp Simply Gourmet Measuring Cups and Spoons Set- https://amzn.to/42Cq7QU |